Estimated Time for Repair: 15 Minutes
Skill Level:
Tools: Phillips Screw Driver, 1/4″ Wrench/Nut-Driver, Hair Dryer/Heat Gun (Not Required)
Step #1 Remove Your Strike Pad
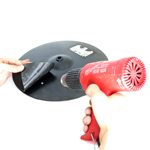
Carefully remove your strike pad from the top of your cymbal. Using a hair-dryer or a heat gun will help make this process easier while reducing the chance of tearing the strike pad. After the strike pad is removed, place it off to the side. You will now see 2 exposed screw heads.
Step #2 Remove Your Trigger Box
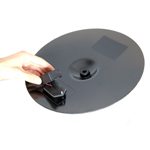
You will noticed 2 nuts on the bottom side of the cymbal that are holding the trigger box in place. Before removing your trigger box, please look at how far the nuts are tightened onto the screws. You will want to re-tighten your new trigger down approximately the same amount. Use your wrench or nut-driver with one hand while loosening the screws from the top with your other hand. After the screws are removed, the box will be loose. You will still have the cymbal box gasket attached to the bottom side of the cymbal. Peel the gasket off of the bottom of the cymbal. You are now ready to re-install the new trigger.
Step #3 Installing The New Trigger
Peel the paper away from new gasket and carefully line up the holes with the holes in the cymbal. Place the trigger box over the gasket, with the jack facing inwards towards the middle of the cymbal. Use your new screws and nuts to tighten the box back down. IMPORTANT: Do not over-tighten the box! Doing so will not harm your trigger, but it will reduce the sensitivity. We suggest testing the sensitivity before placing your strike pad back down. After testing, simply place your strike pad back down.